
Fairy Tree Stump Cake
(Discloser: This is a sponsored post, and I received free product from Nature’s Flavors; However, all opinions and thoughts are my own. Thank you for supporting the brands that keep Inspiration Apron running!)
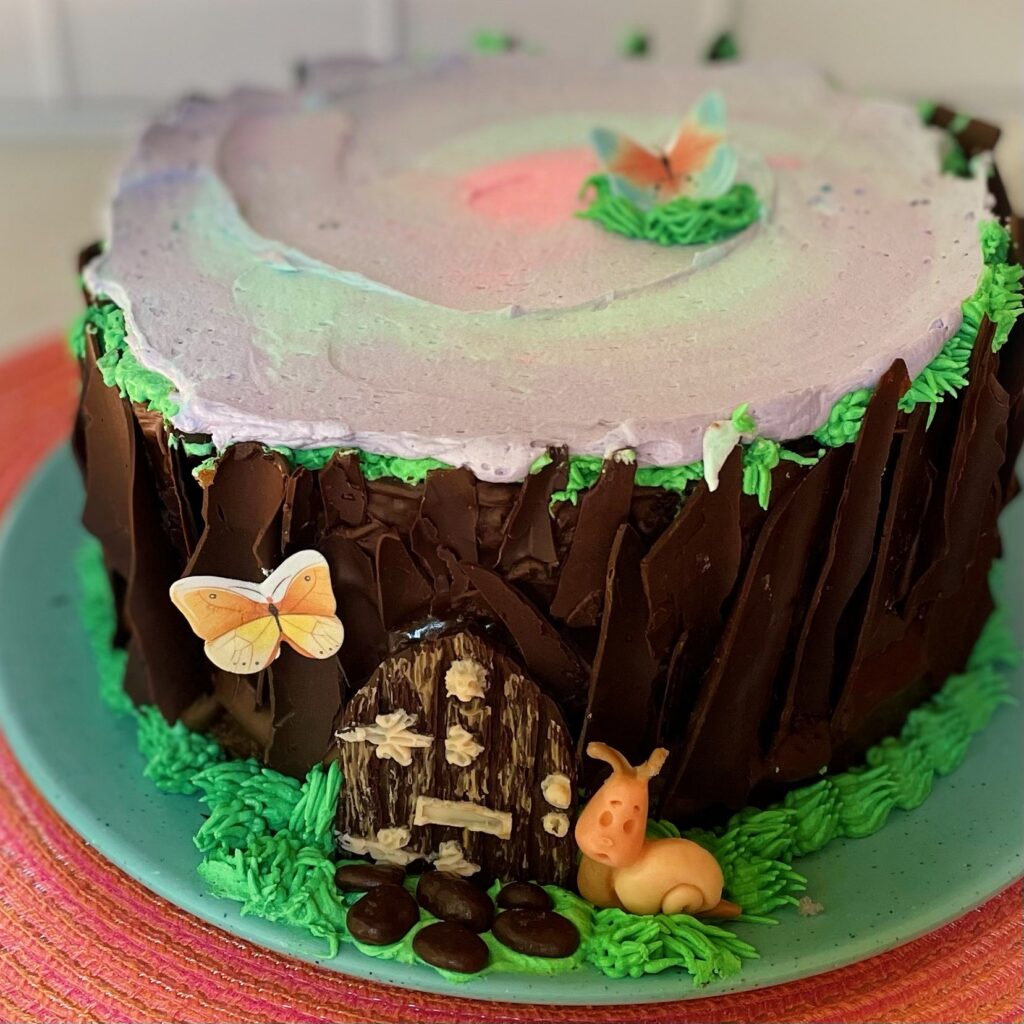
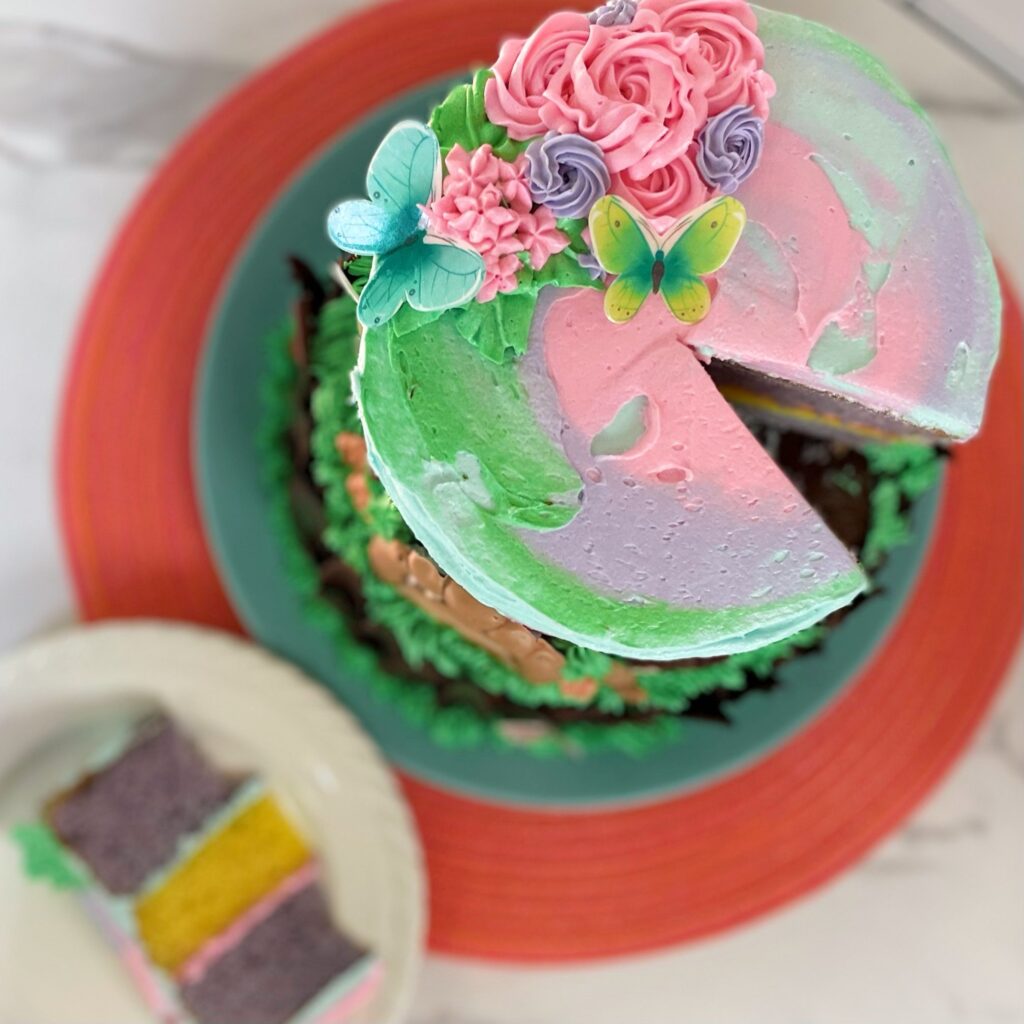
This Fairy Tree Stump Cake is where magic and delicious collide. Wouldn’t this be the most enchanting cake for a fairy or girls birthday party? It’s decorated on the outside with charming fairy doors and windows molded out of chocolate, frosting grass, edible butterflies and stump bark made out of chocolate…it’s a dream come true for my childhood self!

The magic doesn’t stop there though…luscious layers of lavender and lemon cake are covered in a vanilla lavender buttercream frosting. Moist and delicious with every bite! Trust me, this cake is easier made than you think. It all starts with box cake mixes…yep! You want to know my easy secret to adding a hint of lavender flavor to a box cake mix? Swap out some of the liquid for Nature’s Flavors Lavender Flavor Syrup, it’s as easy as that. 😉 Nature’s Flavors has a wide selection of flavors, so just think of the endless possibilities to elevate a simple box mix to something special.
Let’s begin!
Ingredients:

- (1) 15.25oz Duncan Hines Lemon Supreme cake mix (and ingredients on box to make:
- 3 eggs, 1/2 cup oil and water)
- (1) 15.25oz box mix Chocolate Fudge cake mix (I used Betty Crocker Super Moist) along with ingredients to make (eggs, water, oil)
- (1) 15.25oz Duncan Hine Classic White cake mix
- 3 large eggs
- 1/3 cup vegetable oil
- 1/2 cup Nature’s Flavors Lavender Flavor Syrup
- 1/2 cup water
- 2-4 drops of purple/lavender food color or food color powder
- 1 batch of my buttercream frosting recipe, find it HERE. (along with 2 tbsp Nature’s Flavors Lavender Flavor Syrup instead of the milk, and desired food coloring, icing bags and tips for decorating)
- 1 can Duncan Hines creamy Chocolate frosting (or your own favorite chocolate frosting recipe)
- 6-inch and 8-inch cake pans
- 1 cup dark and 1/4 cup white chocolate chips (for melting and making stump bark and fairy doors)
- Edible butterflies (find HERE)
To save time or if you have a smaller party crowd, you can just make a two or three-layered stump cake in the flavor you desire.Note: For vanilla lavender flavored buttercream, simply substitute one of the teaspoons of vanilla extract for Nature’s Flavors Organic Lavender Flavor Extract. Optionally, you can keep vanilla amount and substitute Nature’s Flavors Lavender Flavor Syrup for the milk in the recipe. Find the recipe HERE. Remember to divide frosting between different bowls and add food coloring desired.
Instructions:
Preheat oven to 350℉ / 176℃ and grease and flour three 6-inch pans and three 8-inch pans (or like I did, use two at a time, clean and reuse.) You can also add a small circle of parchment paper to each pan (and grease and flour that also) for an easy removal.
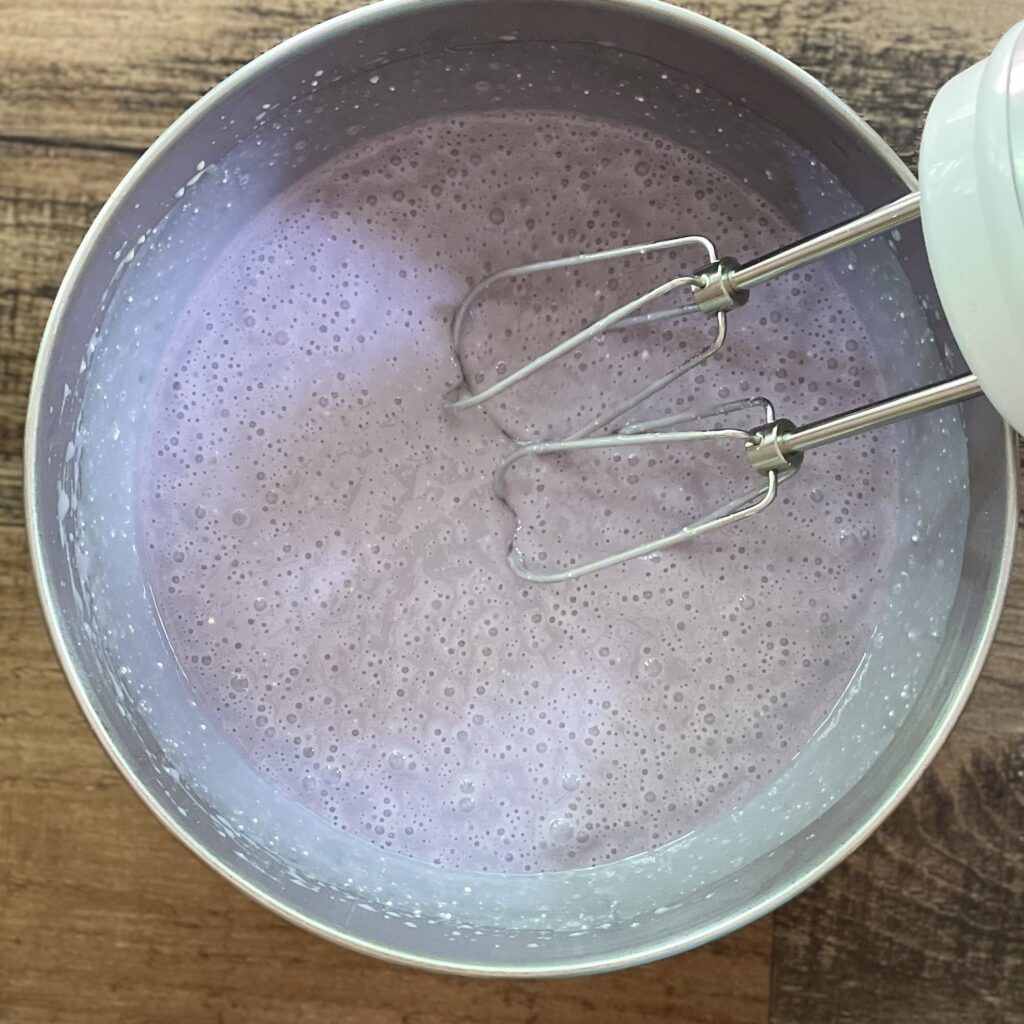
Prepare lemon cake according to the box, making sure to use a 6-inch cake pan for one (adding 1 1/2 cups batter to the pan) and you can use desired size pan for leftover batter or make cupcakes. Prepare chocolate cake as directed on package and bake in 8-inch cake pans. (I used two chocolate layers and one lemon layer for bottom, but you can go all chocolate if you want!) For lavender cake, add white cake mix, 3 eggs, 12 cup lavender flavor syrup, 1/2 cup water and 1/3 cup oil to a large bowl and mix or medium speed for 2-3 minutes or until smooth. Add a few drops of food coloring and mix until an even color is achieved.
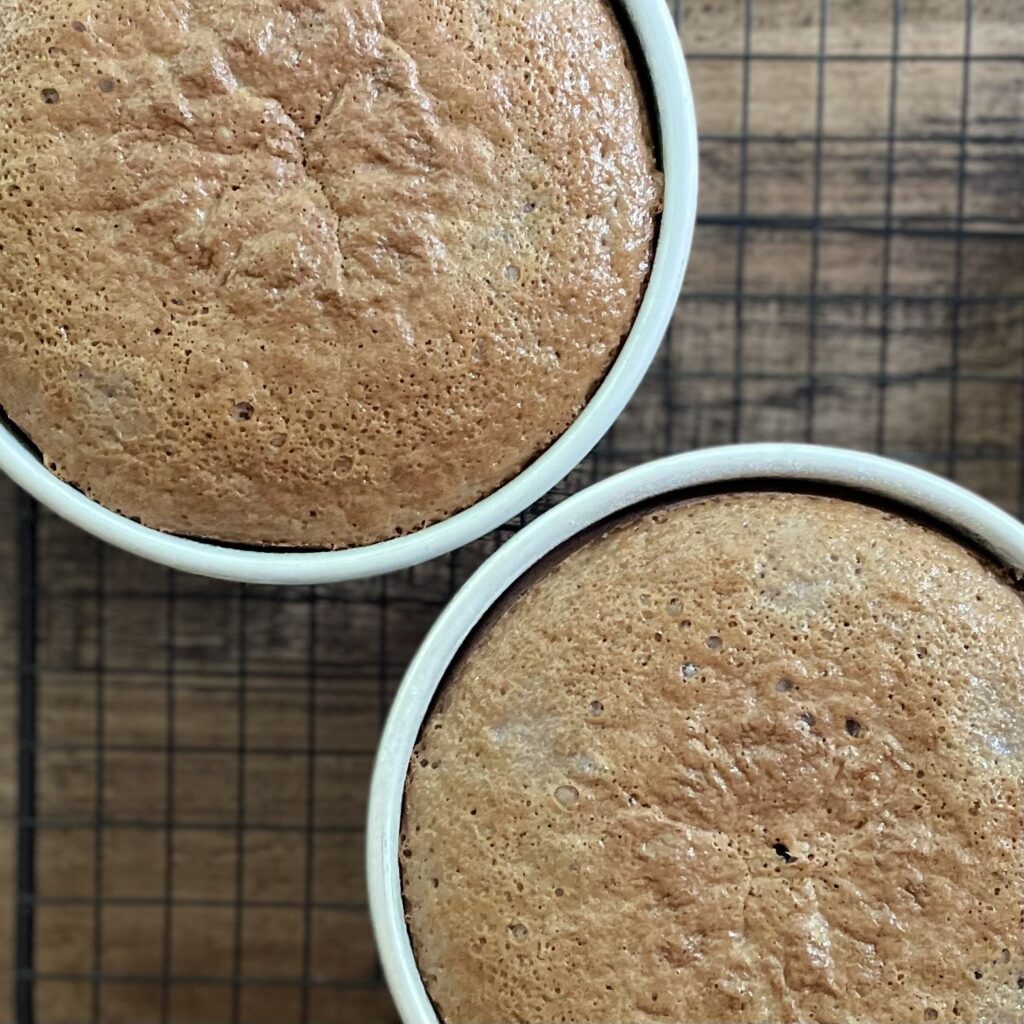
Add 1 1/2 cups batter to each pan and bake for 20-25 minutes or until toothpick inserted comes out clean or with a few moist crumbs.Let all cakes cool in pan for 5-8 minutes, then remove and let cool completely before decorating.
Prepping the details:
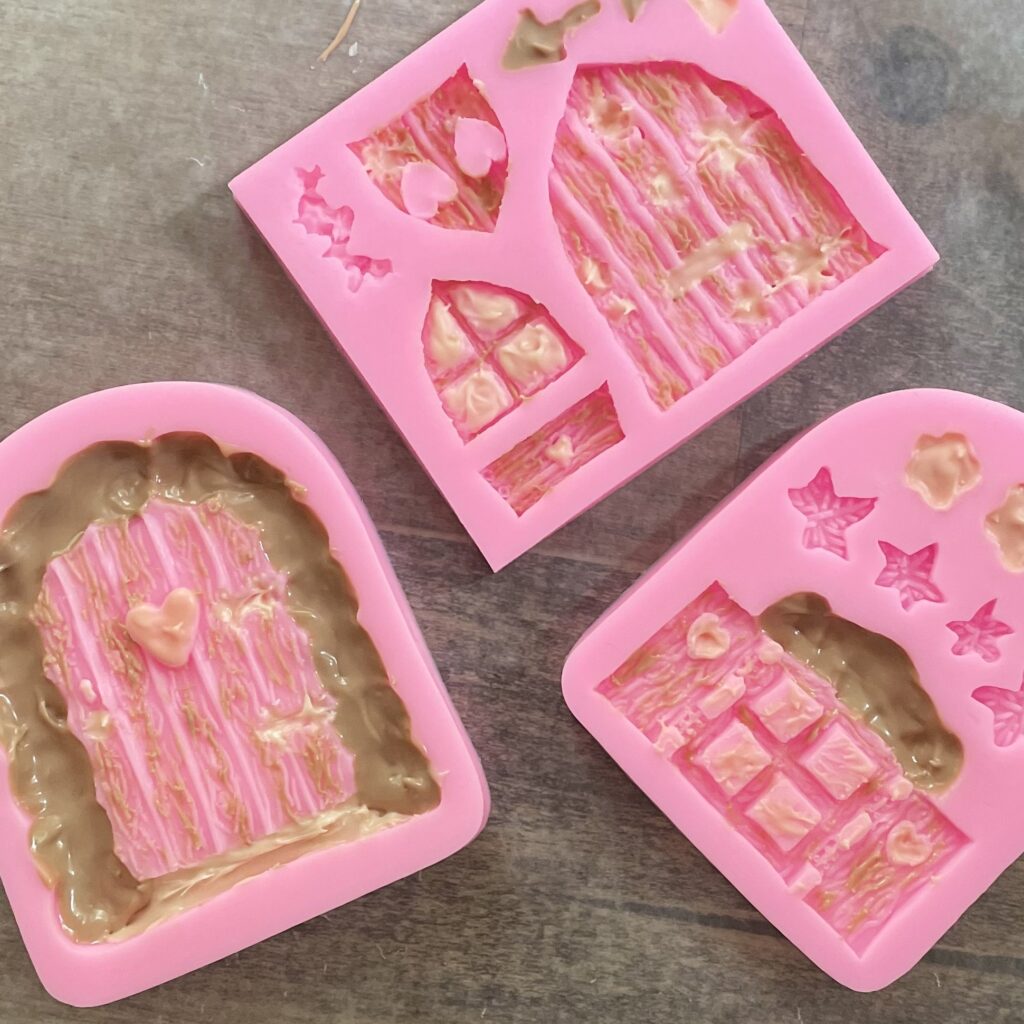
You will want to make the chocolate doors and windows ahead of time. I ordered these easy-to-use silicone fairy door and window molds from Amazon HERE. After washing molds and letting thoroughly dry, I melted some white and dark chocolate, then had another bowl that I mixed the two together to form a different shade for the rocks and mushrooms color.I used a small spoon and a toothpick to fill in areas I wanted to add the lighter shade to first for added detail and depth.

Then I added dark chocolate and let molds set in fridge for at least 15 minutes or until needed. Unmold carefully, but no fret if something breaks, it can be “glued” back together with more melted chocolate.
Melt 1/2 cup dark chocolate according to package directions and then spread a thin layer on a sheet of parchment paper.Roll up chocolate/paper and pace in the fridge until set or until needed. It should set within 10-15 minutes, but I actually left mine in overnight because I was prepping ahead.
Tip: for a more realistic look, use milk and dark chocolate for a more natural color contrast. (but if you know me, I’m only down for eating dark!)
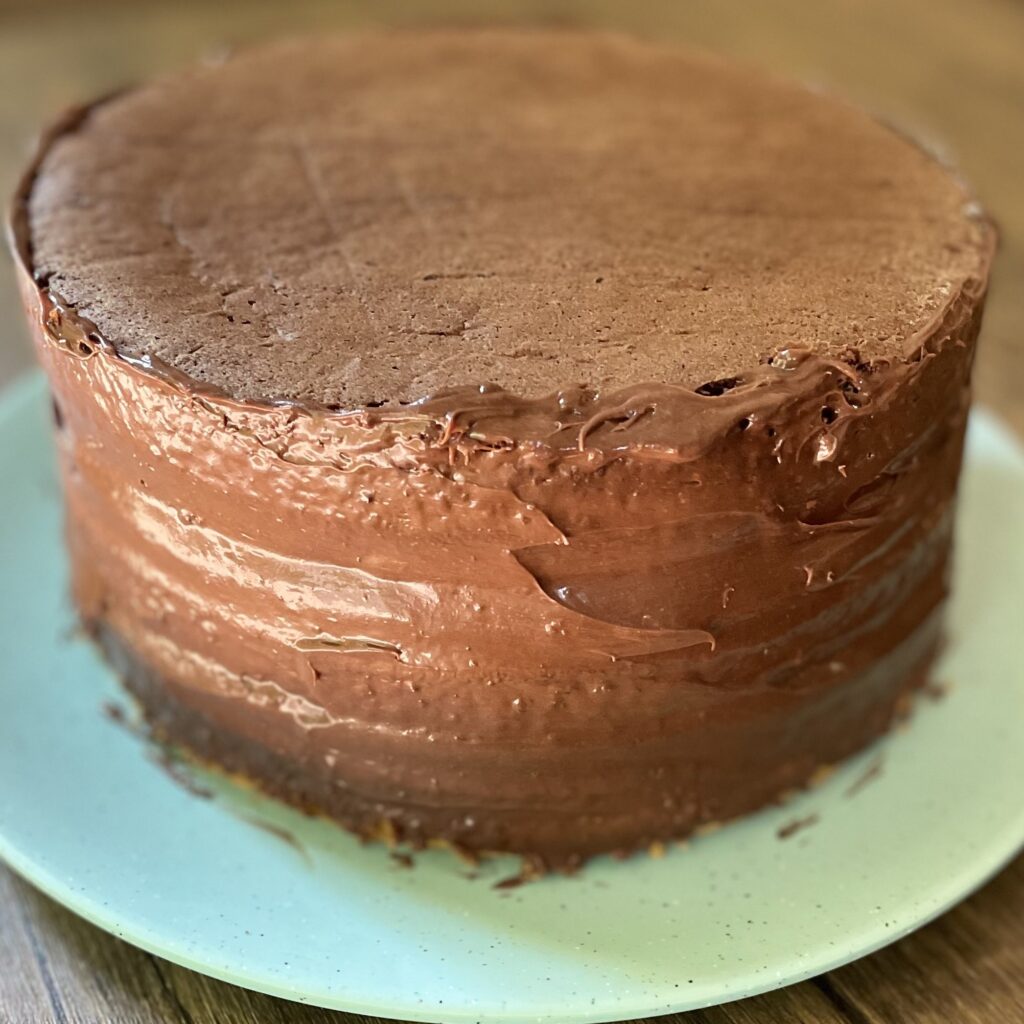
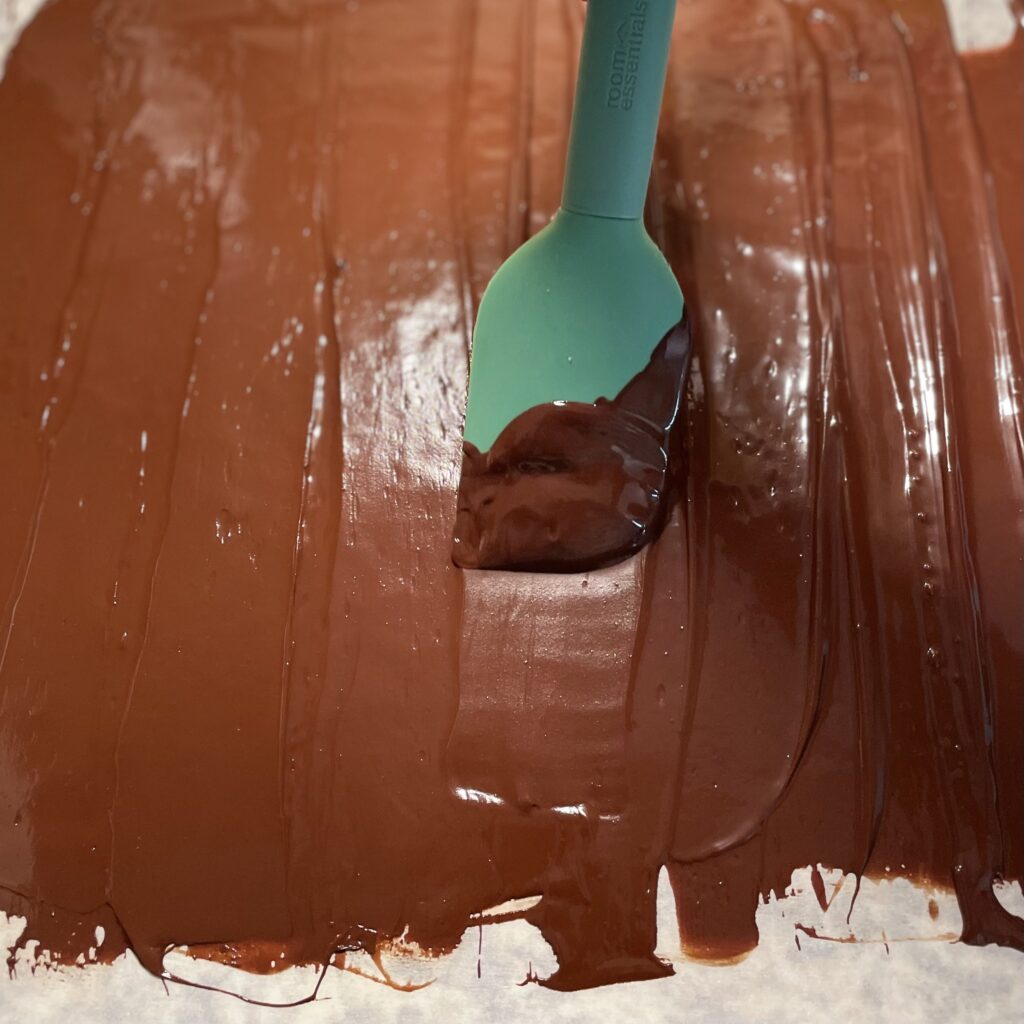
To assemble cake:Be sure to level off cake layers for an even look and stability. Add a dollop of frosting to center of serving plate, then place first cake layer down and add a big dollop of frosting to center. Using an icing spreader or butterknife, start at center and smooth around till frosting is at edges.Repeat for next layer but leave top of cake unfrosted for now. Add a thin layer of chocolate frosting to sides but remember that the sides will be covered up with the chocolate bark, so it doesn’t have to be perfect or smooth.

Spread some buttercream in center of top chocolate layer where the 6-inch layers will be stacked. Place a 6-inch lavender layer in center of chocolate cake and add a dollop of buttercream to center, then spread to outside edges. Repeat with a lemon layer next, then another lavender layer, using frosting color of choice.
Note: Normally, I would use a few dowel rods pushed in center of bottom layers along with a covered cake board for stability, but this cake was not being transported or served at an actual party. However, I would highly recommend adding those things to a two-tiered cake of any size.
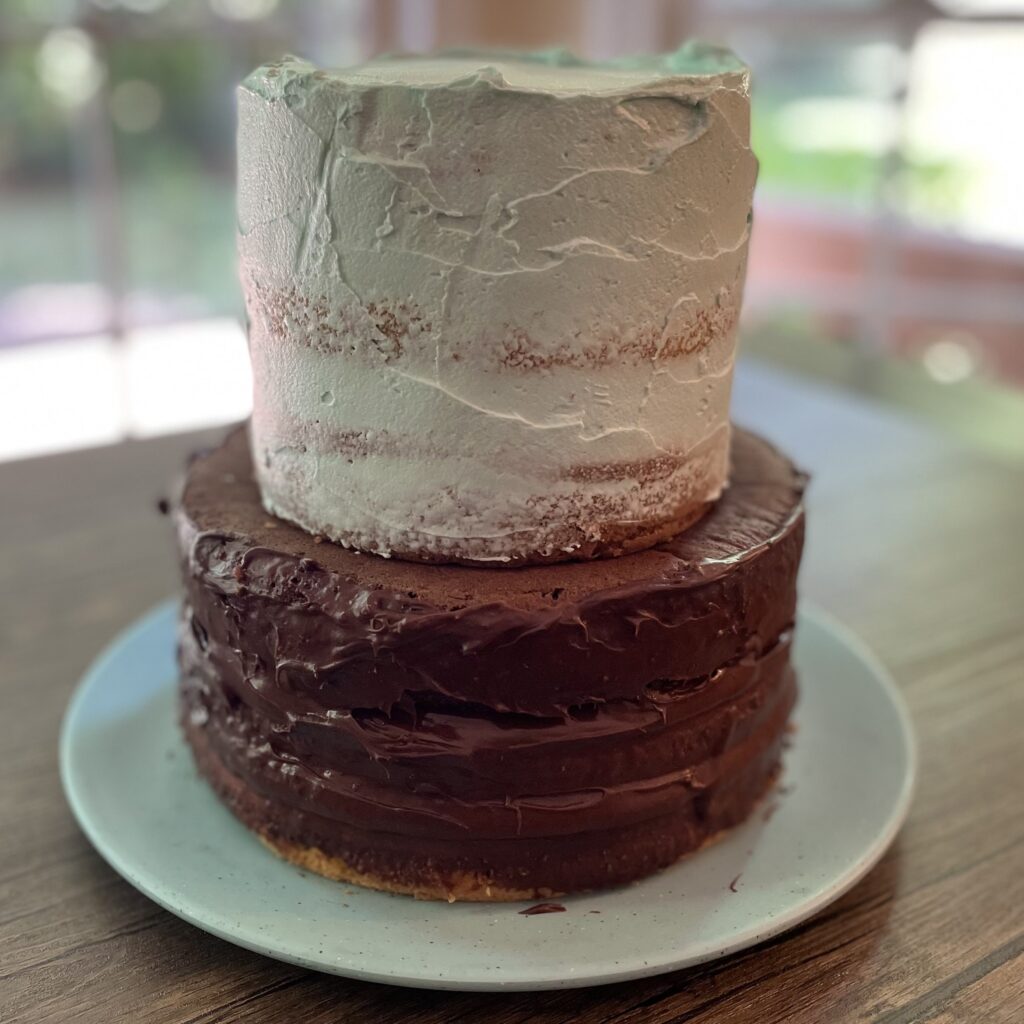
Add a crumb coat of a light-colored frosting to top and sides of 6-inch layers.
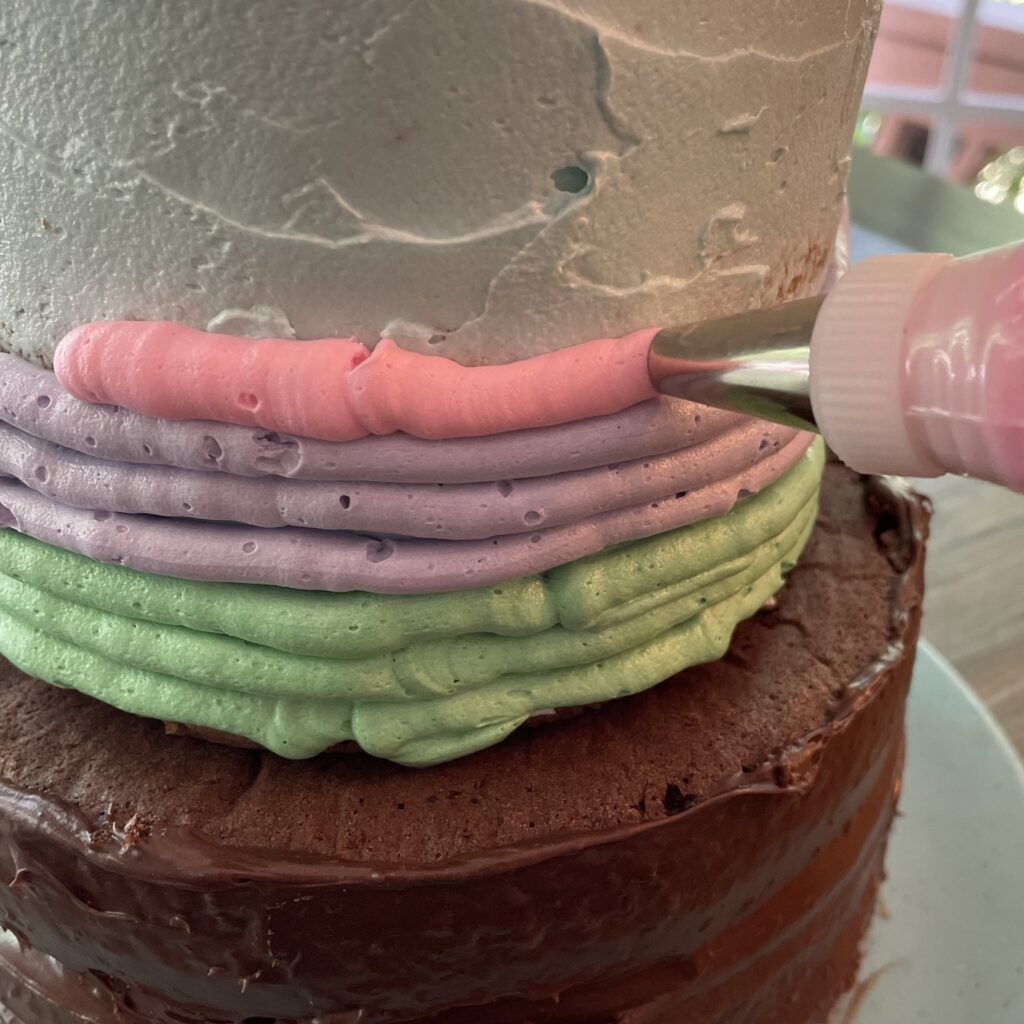
Using a Wilton #12 tip, pipe three lines of each color all around top cake layers, as shown in photo, all the way to the top.
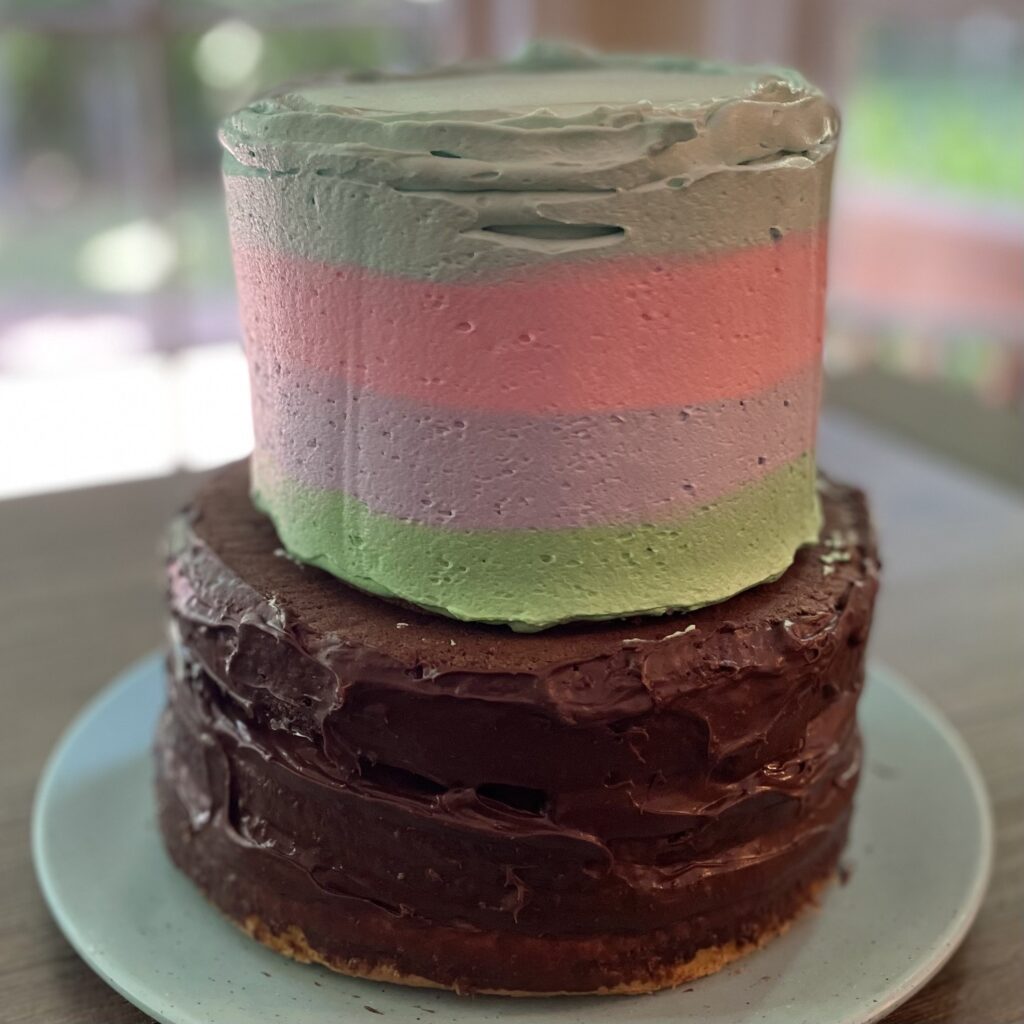
Using a long cake spatula or spreader paddle, smooth frosting all around, while turning cake.
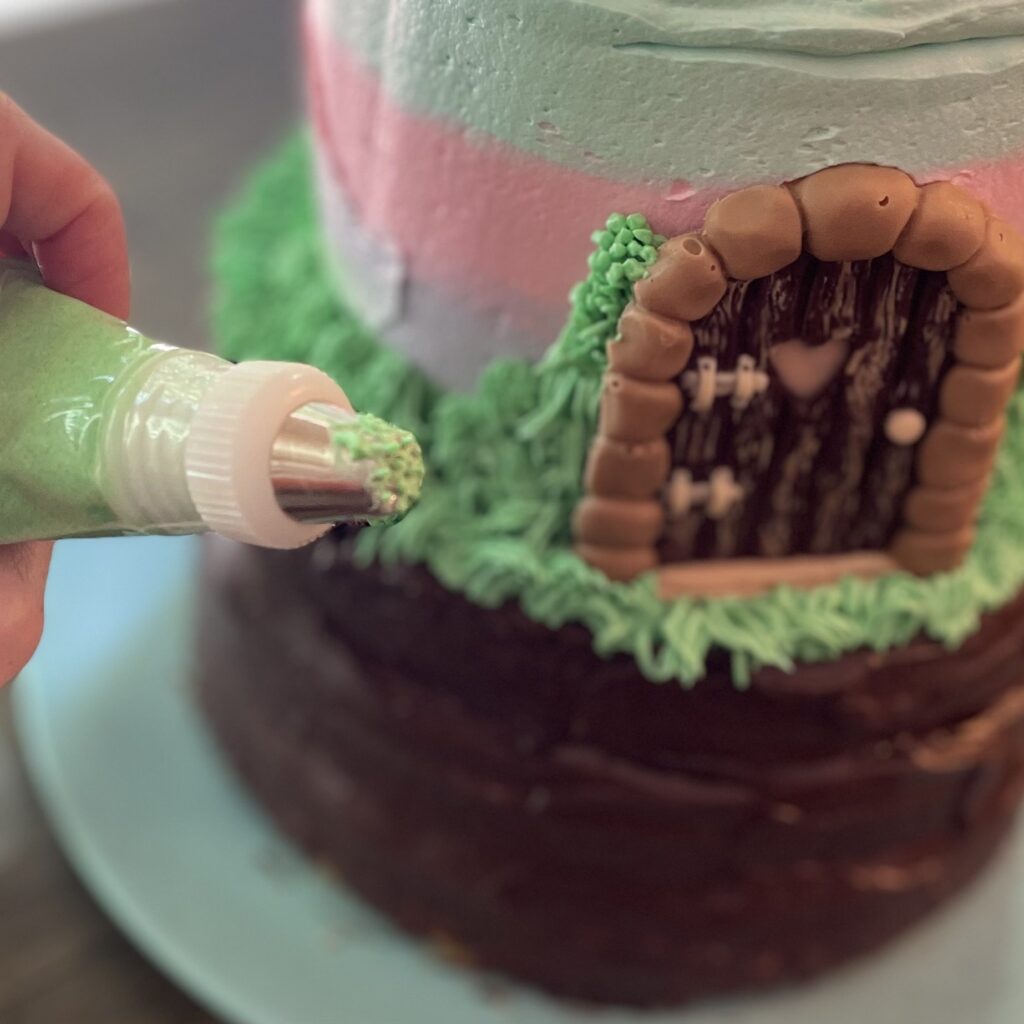
Add a dollop of fresh icing to back of door, then place in desired area of cake.Next, use a Wilton #233 tip to add patches of grass around door and sides of 6-inch layers and top of chocolate cake.
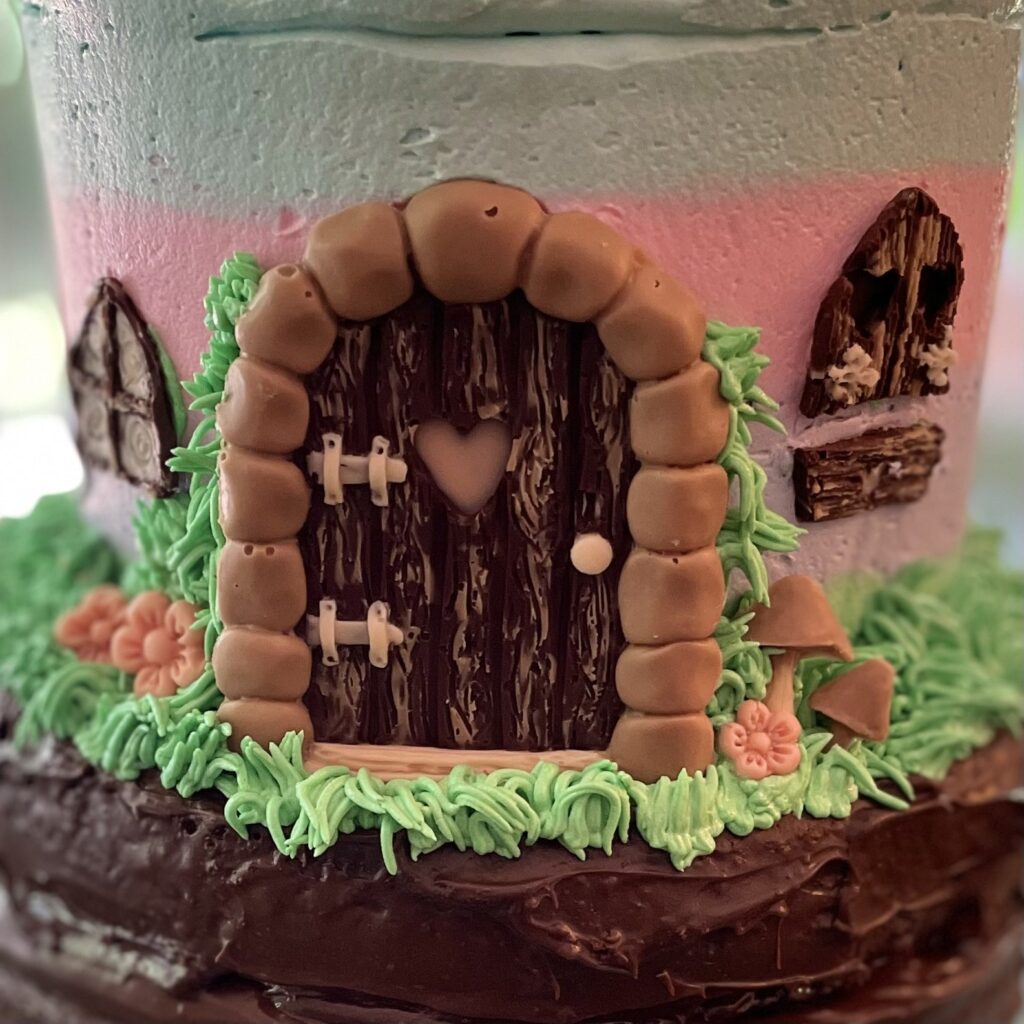
Add dollops of fresh frosting to backs of windows and place on side of cake in desired area, and I also added a few chocolate mushrooms and flowers in the grass.
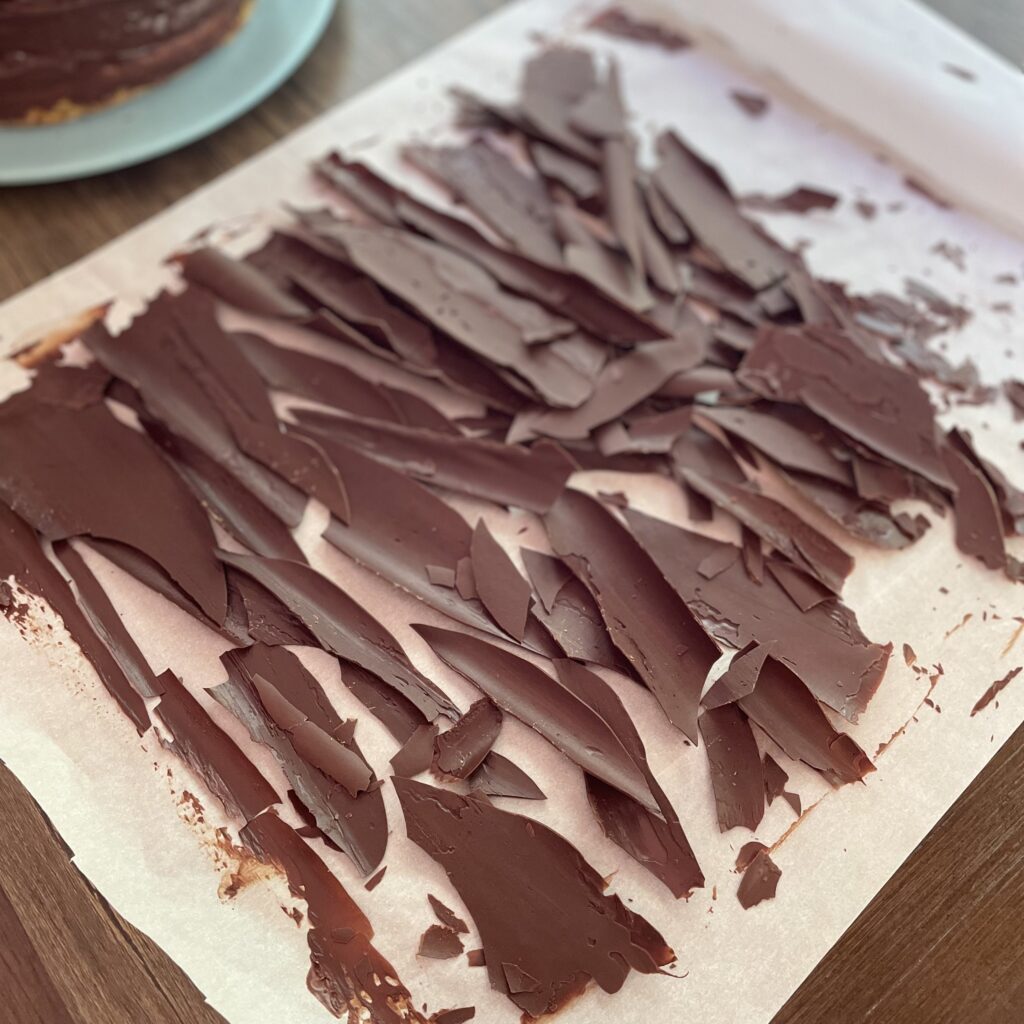
Remove chocolate rolled in parchment paper from refrigerator and unroll. It will break into uneven pieces for the perfect bark look. (You can break into smaller pieces if desired, but try not to handle too much, it will melt in your hands!)
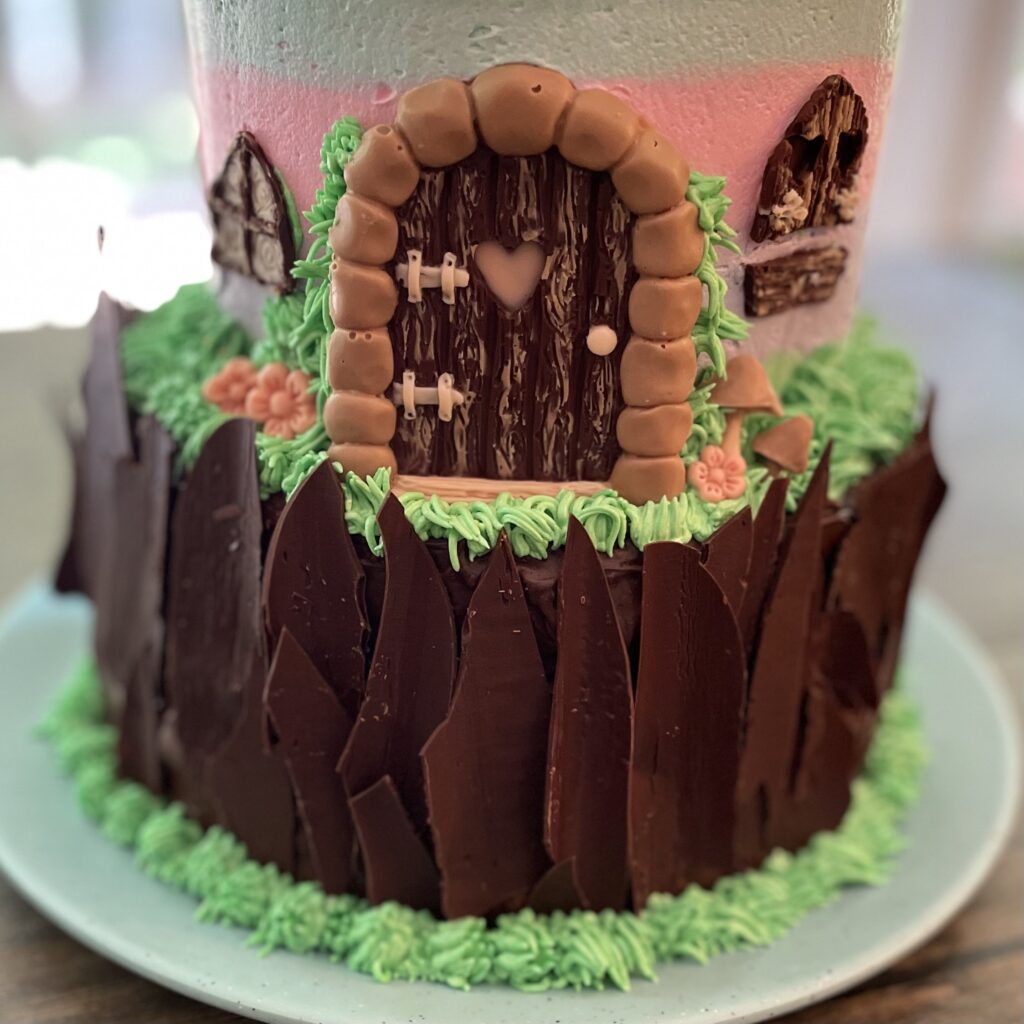
Press chocolate bark gently on the side of the chocolate cake, layering slightly with different sized pieces.Add some more grass patches around the bottom of chocolate cake.
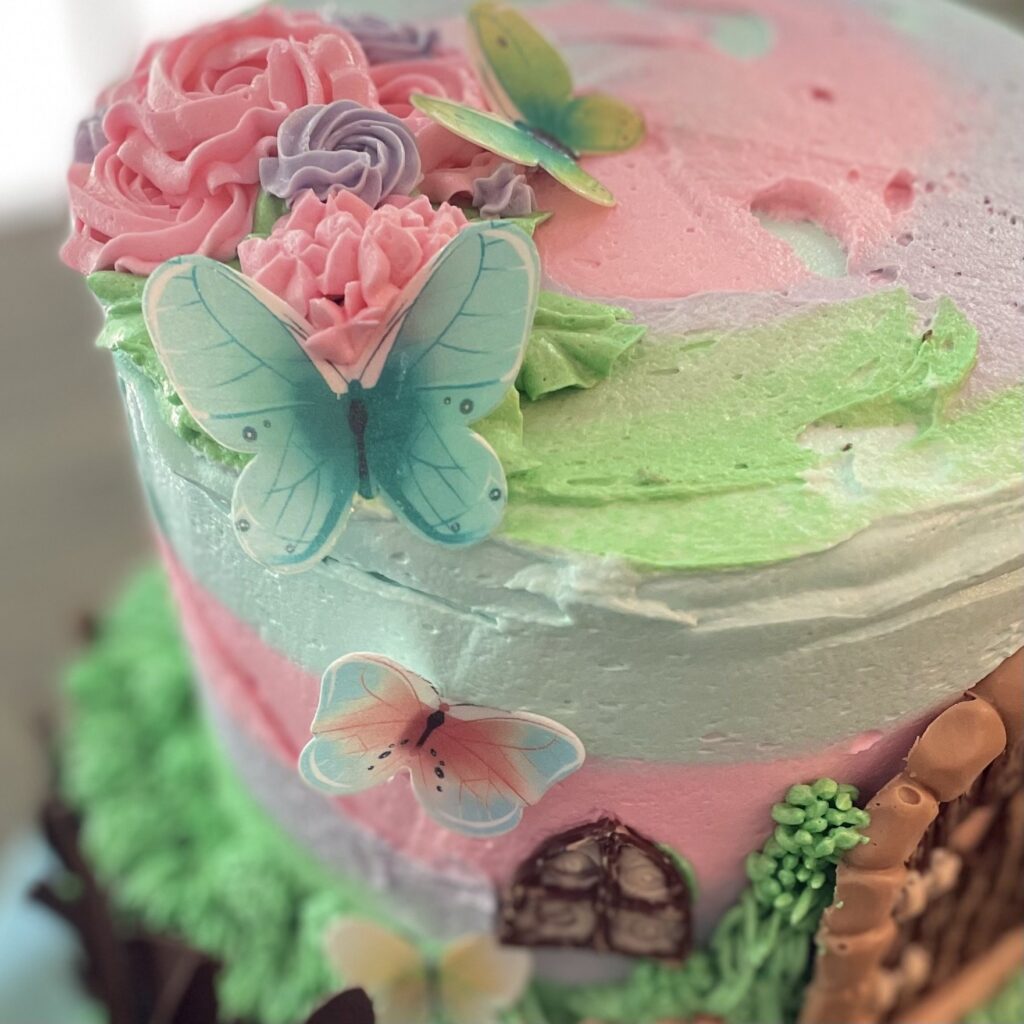
Add a few different color dollops to top cake and spread and swirl for a pastel rainbow effect.Using various decorating tips, you can add leaves and flowers on top, then add edible butterflies to sides and top by placing a small dollop of frosting to underside of butterfly, then gently place/press onto cake.
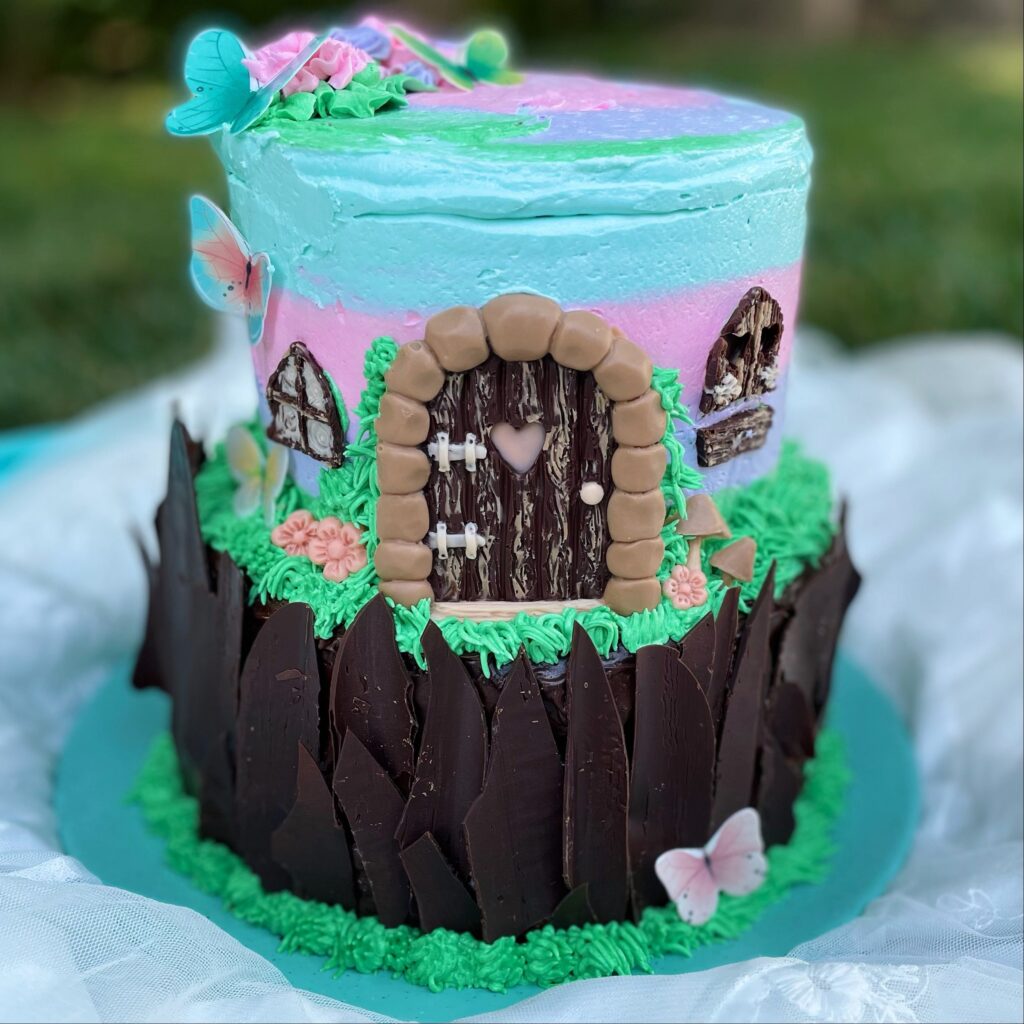
…and there you have it! A magical and enchanting Fairy Stump Cake with layers of deliciousness awaiting your every bite.What a dreamy cake for a girl of any age. This week of fairy posts has really taken me back to my childhood when playing with my cousin Scarlett in the woods, pretending we were sweeping our tree houses front porch with cedar branches and looking under mushrooms for Smurfs. What a wonderful world of imagination, nature and innocence, listening for sweet fairy giggles and being a kid.
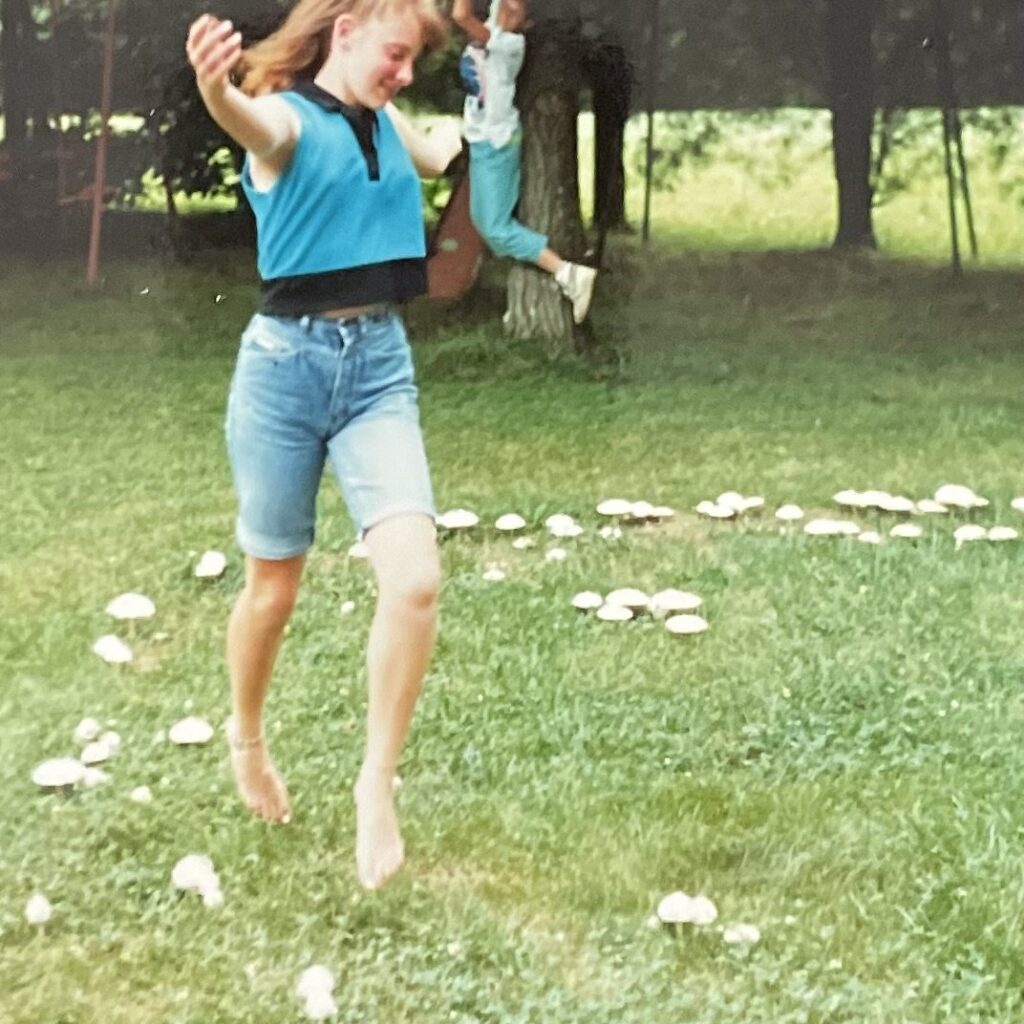
I have to share this fun photo of me dancing around a fairy ring that popped up in our back yard one summer when I was 11-years old. A perfect circle of mushrooms was so intriguing to me, so I researched and found out it was called a fairy ring and the myth and lore surrounding it. Many cultures believe fairy rings were thought to be little realms where fairies dance and play…so my 11-year-old self couldn’t resist pretending to be a magical fairy and do my own dance around the fairy ring (notice that my brother decided hanging from the tree was more fun, haha.)

Even if just to celebrate the delicious magic and beauty of nature, I hope you give this cake a try!
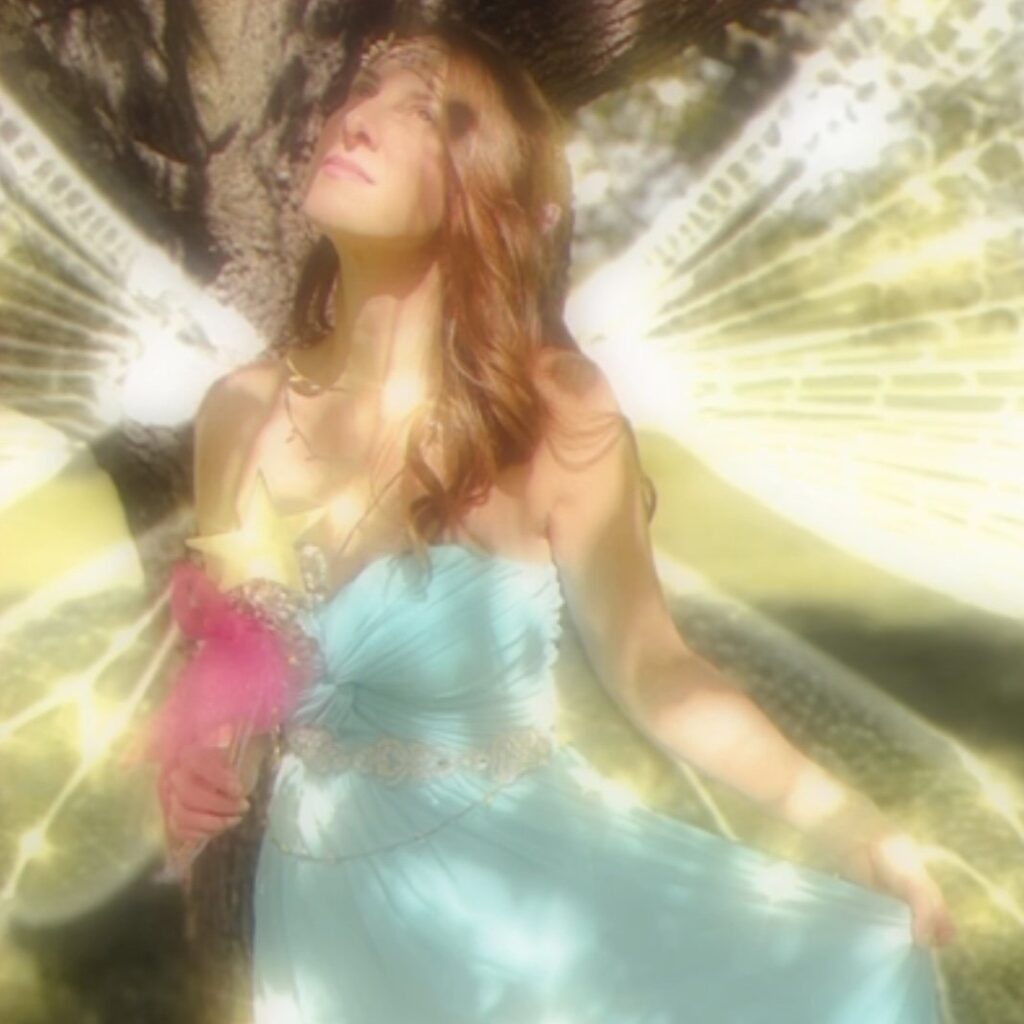
I couldn’t resist dressing up as a fairy in my forties to play pretend one more time! I bought a $5 dress at Goodwill and used items in my craft arsenal to create wand and flower head piece. The fairy wings were added with a photo app called Prequel. Credit to my mom for taking the photo.💗
Enjoy!
💜Julie
Fairy Tree Stump Cake (Lavender Lemon Flavor)
Ingredients
- 1 15.25oz Duncan Hines Lemon Supreme cake mix (and ingredients on box to make: 3 eggs, 1/2 cup oil and water)
- 1 15.25oz box mix Chocolate Fudge cake mix (I used Betty Crocker Super Moist) along with ingredients to make (eggs, water, oil)
- 1 15.25oz Duncan Hine Classic White cake mix
- 3 large eggs
- 1/3 cup vegetable oil
- 1/2 cup Nature’s Flavors Lavender Flavor Syrup
- 1/2 cup water
- 2-4 drops of purple/lavender food color or food color powder
- 1 batch of my buttercream frosting recipe find it HERE. (along with 2 tbsp Nature’s Flavors Lavender Flavor Syrup instead of the milk, and desired food coloring, icing bags and tips for decorating)
- 1 can Duncan Hines creamy Chocolate frosting or your own favorite chocolate frosting recipe
- 6- inch and 8-inch cake pans
- 1 cup dark and white chocolate chips for melting and making stump bark and fairy doors
- Edible butterflies find HERE
Disclaimer:
Nutritional Information is provided as a courtesy only and should be viewed as an estimate. Ingredients can vary with brands and size and Inspiration Apron makes no guarantees to the accuracy of this information.
Instructions
- For vanilla lavender flavored buttercream, simply substitute one of the teaspoons of vanilla extract for Nature’s Flavors Organic Lavender Flavor Extract.
- Optionally, you can keep vanilla amount and substitute Nature’s Flavors Lavender Flavor Syrup for the milk in the recipe.
- Find the recipe HERE. Remember to divide frosting between different bowls and add food coloring desired. Be sure to at least have green for the grass.
- You will want to make the chocolate doors and windows ahead of time. I ordered these easy-to-use silicone fairy door and window molds from Amazon HERE.
- After washing molds and letting thoroughly dry, I melted white chocolate and 1/2 cup dark chocolate, then had another bowl that I mixed the two together to form a different shade for the rocks and mushrooms color.
- I used a small spoon and a toothpick to fill in areas I wanted to add the lighter shade to first for added detail and depth.
- Then I added dark chocolate and let molds set in fridge for at least 15 minutes or until needed. Unmold carefully, but no fret if something breaks, it can be “glued” back together with more melted chocolate.
- To make the chocolate bark: Melt 1/2 cup dark chocolate according to package directions and then spread a thin layer on a sheet of parchment paper. Roll up chocolate/paper and pace in the fridge until set or until needed. It should set within 10-15 minutes, but I actually left mine in overnight because I was prepping ahead.
- Tip: for a more realistic look, use milk and dark chocolate for a more natural color contrast. (but if you know me, I’m only down for eating dark chocolate!) When ready to apply to cake, remove from fridge and unroll parchment paper. Chocolate will break into pieces that resemble bark.
- Be sure to level off cake layers for an even look and stability. Add a dollop of frosting to center of serving plate, then place first cake layer down and add a big dollop of frosting to center. Using an icing spreader or butterknife, start at center and smooth around till frosting is at edges.
- Repeat for next layer but leave top of cake unfrosted for now. Add a thin layer of chocolate frosting to sides but remember that the sides will be covered up with the chocolate bark, so it doesn’t have to be perfect or smooth.
- Spread some buttercream in center of top chocolate layer where the 6-inch layers will be stacked. Place a 6-inch lavender layer in center of chocolate cake and add a dollop of buttercream to center, then spread to outside edges. Repeat with a lemon layer next, then another lavender layer, using frosting color of choice. (Note: Normally, I would use a few dowel rods pushed in center of bottom layers along with a covered cake board for stability, but this cake was not being transported or served at an actual party. However, I would highly recommend adding those things to a two-tiered cake of any size.)
- Add a crumb coat of a light-colored frosting to top and sides of 6-inch layers.
- Using a Wilton #12 tip, pipe three lines of each color all around top cake layers, as shown in photo, all the way to the top.
- Using a long cake spatula or spreader paddle, smooth frosting all around, while turning cake.
- Add a dollop of fresh icing to back of door, then place in desired area of cake.
- Next, use a Wilton #233 tip to add patches of grass around door and sides of 6-inch layers and top of chocolate cake.
- Add dollops of fresh frosting to backs of windows and place on side of cake in desired area, and I also added a few chocolate mushrooms and flowers in the grass.
- Remove chocolate rolled in parchment paper from refrigerator and unroll. It will break into uneven pieces for the perfect bark look. (You can break into smaller pieces if desired, but try not to handle too much, it will melt in your hands!)
- Press chocolate bark gently on the side of the chocolate cake, layering slightly with different sized pieces.
- Add some more grass patches around the bottom of chocolate cake.
- Add a few different color dollops to top cake and spread and swirl for a pastel rainbow effect.
- Using various decorating tips, you can add leaves and flowers on top, then add edible butterflies to sides and top by placing a small dollop of frosting to underside of butterfly, then gently place/press onto cake.
- …and there you have it! A magical and enchanting Fairy Stump Cake with layers of deliciousness awaiting your every bite.